


How to Test Your Garage Door’s Safety Sensors in Under 5 Minutes
Garage door safety sensors are small devices near the floor that prevent the door from closing if something’s in the way, keeping your family, pets, and car safe. Testing them regularly ensures they work properly and helps avoid accidents or costly repairs. This guide will show you how to test your garage door’s safety sensors in under 5 minutes using simple steps anyone can follow. Let’s get started and keep your garage door safe!
Why Testing Safety Sensors Matters
Safety sensors are required on modern garage doors to stop the door from closing on objects, people, or pets. If they’re misaligned, dirty, or broken, the door might not close, reverse unexpectedly, or worse, fail to stop, causing damage or injury. Testing takes just a few minutes and can prevent problems like a stuck door or a $100 to $200 repair bill from a service like Garage Door Pros MI. Doing this monthly keeps your door reliable and safe.
Tools You’ll Need
You don’t need much to test your sensors:
- A soft cloth or paper towel.
- A screwdriver (optional, for minor adjustments).
- A small object, like a box or broom, to test the sensor beam.
Step-by-Step Guide to Testing Your Garage Door’s Safety Sensors
Follow these quick steps to test your sensors and ensure they’re working correctly. The whole process should take less than 5 minutes.
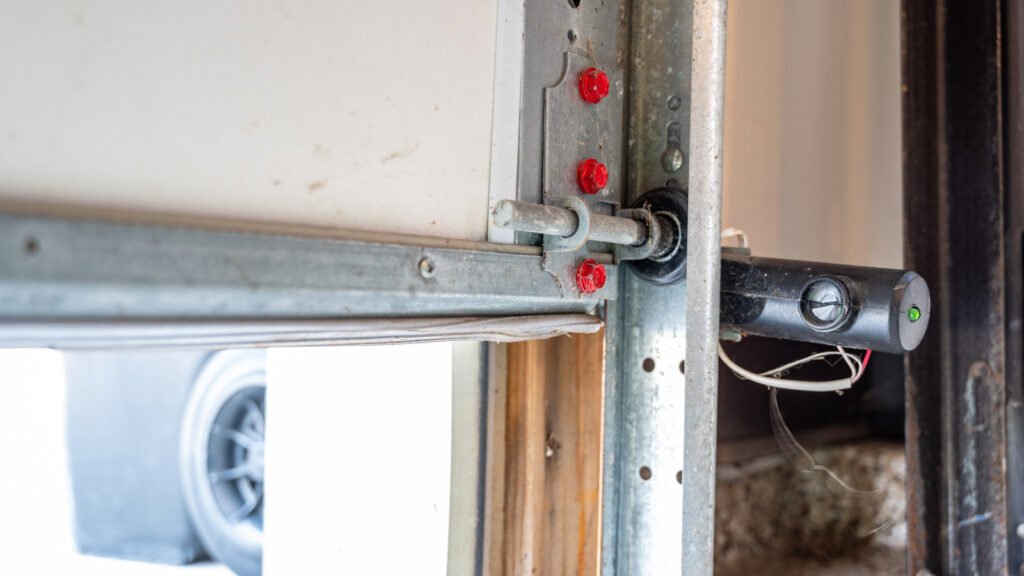
Step 1: Locate the Sensors
Find the safety sensors on both sides of your garage door, near the floor, about 4 to 6 inches off the ground. They’re small, usually plastic, and have a light (often green or amber) on each one. One sensor sends an invisible beam, and the other receives it. If the beam is broken, the door won’t close.
Time: 30 seconds.
Step 2: Check the Indicator Lights
Look at the lights on both sensors. They should be steady and on, indicating the sensors are aligned and working.
- If both lights are steady, the sensors are likely fine.
- If one or both lights are off, blinking, or dim, there’s an issue with alignment, dirt, or wiring.
Fix:
- If the lights are off or blinking, gently wiggle the sensors to see if loose brackets are causing the issue.
- If they’re still not steady, move to the next steps.
Time: 1 minute.
Step 3: Clean the Sensor Lenses
Dirt, dust, or spiderwebs on the sensor lenses can block the beam, causing the door to malfunction.
How to Do It:
- Use a soft cloth or paper towel to gently wipe the lens on each sensor. Avoid harsh chemicals that could scratch the lens.
- Check for cobwebs or debris around the sensors and clear them away.
- After cleaning, check the lights again to see if they’re steady.
Time: 1 minute.
Step 4: Test the Sensor Beam
To confirm the sensors work, test the beam by interrupting it while the door closes.
How to Do It:
- Open your garage door fully using the wall button or remote.
- Place a small object, like a box or broom, in the door’s path, breaking the sensor beam.
- Press the button to close the door. It should stop and reverse back up when it detects the object.
- If the door doesn’t reverse, the sensors aren’t working properly.
Safety Note: Stand clear of the door while testing to avoid injury.
Time: 1 minute.
Step 5: Adjust Sensor Alignment (If Needed)
If the sensor lights are off or the door doesn’t reverse during the beam test, the sensors may be misaligned.
How to Do It:
- Loosen the screws or wingnuts on one sensor’s bracket with a screwdriver or by hand.
- Gently move the sensor up, down, or side to side until both lights are steady. The beam needs to line up perfectly between the sensors.
- Tighten the screws to secure the sensor in place.
- Retest the beam by placing an object in the path and closing the door again.
Time: 1 to 2 minutes.
What to Do If the Sensors Still Don’t Work
If cleaning and aligning don’t fix the issue, there might be a problem with the wiring or the sensors themselves.
- Check Wiring: Look for loose or damaged wires connecting the sensors to the opener. If you see frayed wires, call a professional to repair or replace them.
- Test Power: Ensure the opener is plugged in and the outlet works. Try plugging in another device, like a lamp, to check.
- Replace Sensors: If the sensors are faulty, replacements cost $50 to $100, and professional installation might run $100 to $200. Contact a service like Garage Door Pros MI for help.
Don’t ignore faulty sensors, as they’re critical for safety and proper door operation.
Tips to Keep Sensors Working Year-Round
- Clean Monthly: Wipe sensors regularly to prevent dirt buildup, especially in dusty or snowy seasons.
- Check After Storms: Snow, ice, or wind can knock sensors out of alignment. Test them after bad weather.
- Protect Sensors: If your garage is prone to bumps from bikes or tools, consider adding protective covers, available for $10 to $20.
- Schedule Maintenance: Have a professional inspect your door and sensors yearly to catch issues early, costing $75 to $150.
Common Mistakes to Avoid
- Using Harsh Cleaners: Stick to a soft cloth and water to avoid damaging sensor lenses.
- Ignoring Blinking Lights: A blinking light means the sensors aren’t aligned or working. Don’t force the door to close.
- Skipping Tests: Test the beam regularly, even if the lights look fine, to ensure the sensors function properly.
- DIY Electrical Fixes: Leave wiring or opener repairs to professionals to avoid electric shock or further damage.
Why Testing Sensors Saves Time and Money
Testing your garage door’s safety sensors takes just a few minutes but can prevent big problems. Faulty sensors can cause the door to malfunction, damage your car, or injure someone. Fixing a misaligned sensor yourself is free, while replacing a broken opener or repairing a damaged door can cost $300 to $1,000. Regular testing also ensures your door meets safety standards, keeping your home secure and avoiding liability issues.
Final Thoughts
Testing your garage door’s safety sensors is a quick, easy task that every homeowner can do. In under 5 minutes, you can check the lights, clean the lenses, and test the beam to ensure your door is safe and reliable. By staying on top of this simple maintenance, you avoid costly repairs, protect your family, and keep your garage door working smoothly. Grab a cloth and a box, and test your sensors today, your garage door will thank you, and so will your wallet!


